VMware provides a comprehensive suite of APIs designed as web services that facilitate interaction with all its solutions.
You can use Broadcom Developer Documentation to find more details of all available product APIs.

You can interact with these APIs through multiple methods/tools. One of the simplest and most widely used tool is 'curl'. With curl, users can send HTTP requests to the VMware APIs, allowing them to retrieve data, update configurations, and perform other operations with minimal setup.
Linux curl manpage - https://linux.die.net/man/1/curl
To use curl effectively, users need to be familiar with the basic syntax, which typically includes specifying the request type (such as GET, POST, PUT, or DELETE), the URL of the API endpoint, and any necessary headers or data payloads. For instance, when making a GET request to retrieve information about a virtual machine, users would construct a command that specifies the appropriate API endpoint for that virtual machine, along with any required authentication tokens or parameters.
Note: Starting with Windows 10 and Windows Server 2019 - curl is included as an executable.
Using 'curl' to interact with the API
In this section, we will take a look at how to use curl to connect and interact with vCenter API.
To start with you will need to authenticate a session with the API and then use the session ID for subsquent interactions with it.
To authenticate and procure a session ID use the following syntax:
Syntax:
curl -k -X POST "https://hostname-of-vcenter/api/session" -u <username>

Example:
curl -k -X POST "https://corevc/api/session" -u administrator@vsphere.local
If authenticated successfully, the output of the command should return a session ID.

After obtaining the session ID, you can interact with the API using it without needing to re-enter the credentials.
Syntax:
curl -k -X GET "https://hostname-of-vcenter/api/session" -H "vmware-api-session-id:<Session ID from the previous step>"

Example:
curl -k -X GET "https://corevc/api/vcenter/vm" -H "vmware-api-session-id:4a89b7fa8a6342a7d64b16b61e6db019"
While curl is simple for basic requests, more complex scenarios involving multiple headers, authentication methods, or data formats can become cumbersome and hard to manage. The output from curl is plain text, making it less suitable for users who require structured data formats like JSON or XML without additional processing.
If not used carefully, curl commands can inadvertently expose sensitive information, such as authentication tokens or passwords, especially when logged in shell history.
Another case is that testing an API stack can be overwhelming due to its extensive range. Crafting curl statements for each part of the API and keeping track of all the commands for future use can be a laborious task. This challenge grows when there are numerous API endpoints to test. This is where an API client like Postman proves useful.
Using an API client like Postman
Postman is not just a basic API client; it is user-friendly and can maintain a history of all your API calls.
It provides a GUI that simplifies the process of sending requests and viewing responses. This eliminates the need to memorize complex curl commands or manage them manually. You can easily create and organize requests into collections, allowing for better management/categorization of different endpoints and their associated tests.
Postman also includes powerful testing capabilities, enabling users to write test scripts that can validate API responses against expected outcomes. This automated testing feature not only saves time but also enhances the reliability and accuracy of the testing process. Users can create assertions to check for status codes, response times, and data integrity, ensuring that the API behaves as intended under various conditions.
Installing Postman
Installtion of Postman is pretty straightforward.
It can be donwloaded from https://www.postman.com/downloads/.
Once downloaded run the setup to complete the installation.
It is important to note that some features such as workspaces, collections, version control, etc are only available once you sign in to your postman account. The signup is free.

Using Postman to interact with vSphere API
To query vSphere API, you will need to establish an API session with the endpoint, in this case, we will use the vCenter as the endpoint. This can be done by POSTing a session request to the endpoint using the API path for a session key - https://vcenterfqdn/api/session
Authorization Type: Basic (There are mulitple authentication mechanisms. For simplicity I have used basic auth in this blog) . Supply a username and password. You might notice that the password is a variable referenced using the curly braces. Here, vadminpass is an Postman environment variable of type secret to strore the password.
If the basic authentication succeeds, it should return a session key. You can use the session key to authenticate future API calls.

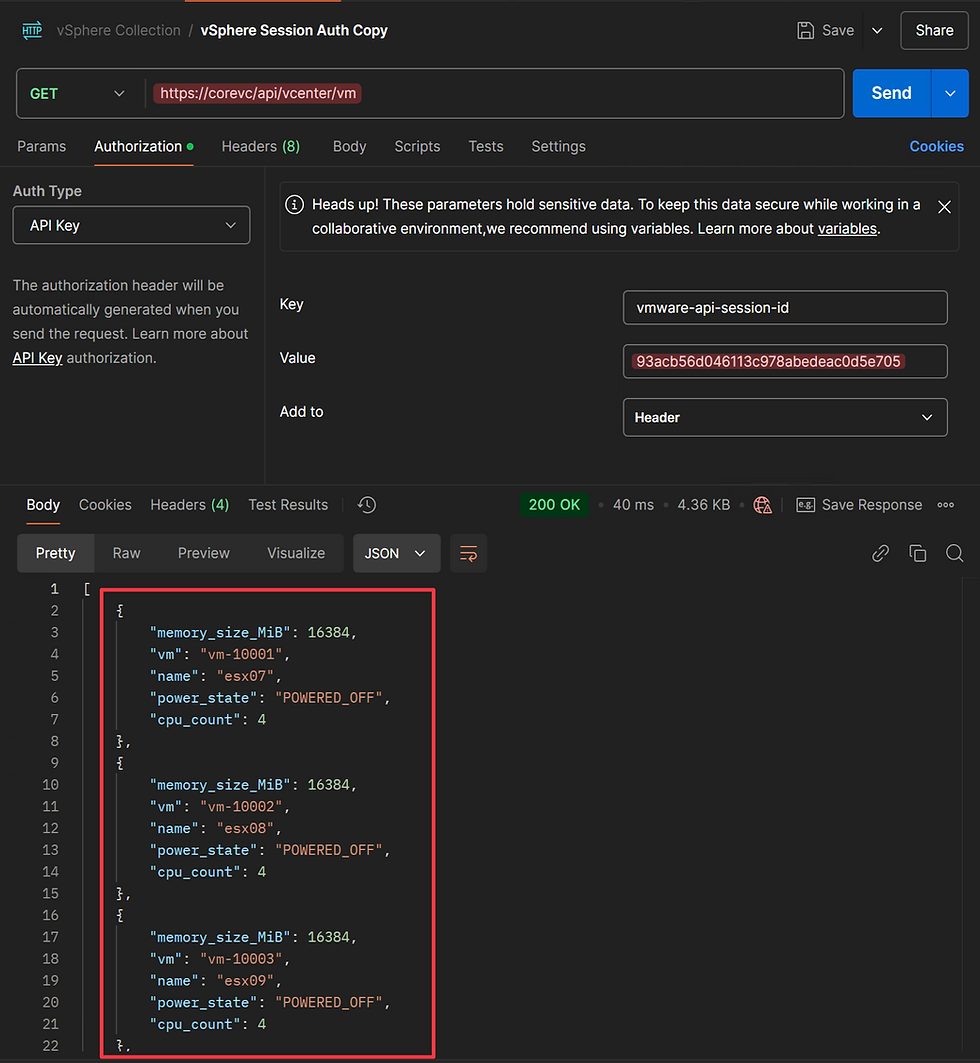
Now that we have a session ID, let's attempt a GET request to find all VMs managed by the endpoint vCenter. If the request is successful, it should return a status code 200 and display the output.

The output can be displayed in multiple formats.


In a future post, we will explore how to use Postman in more detail. The goal here was to introduce you to the two most common methods of interacting with the vSphere API.
ความคิดเห็น